Setting up DNS records (MX, SPF, DKIM, and DMARC) might sound technical and intimidating. Don’t worry! This guide will break down every step in simple terms. You need to configure DNS settings to verify your domain. This process ensures your emails reach recipients without being seen as spam. DNS settings are not only for spam. Let’s start by understanding the complete setup process.
Why DNS Setup Matters?
Your DNS (Domain Name System) records act like digital passports for your domain. When you add DNS records, you’re telling email systems, “Yes, this domain is authorized to send email through Textdrip (or your business).”
If you have not properly configured DNS, your emails may be blocked, meaning recipients might not receive your emails. Which impacts your brand reputation.
Proper DNS configuration protects your business against spoofing and phishing. It improves your brand reputation and lets you do better inbox placement.
The good news? DNS setup takes only 15 to 20 minutes!
Here are a few different fields that you’ll need to set up in DNS records.
- TXT – This is used to send email to the recipient on behalf of your domain.
- MX – When you set this DNS record in your domain, incoming email on your domain will be forwarded to Textdrip.
- CNAME – It’s necessary for tracking opens, clicks, and unsubscribes, etc., for your sent emails using your domain.
- DMARC – An authentication record that is required by Google and Yahoo. It will reduce the chance of email being marked as spam.
Prerequisite for DNS Setup
Before you start the DNS setup, you need access to your domain registrar. A domain registrar is the company (domain provider) from which you bought your domain. Some common domain registrars include GoDaddy, Namecheap, Google Domains, Cloudflare, etc. Ensure you have your login credentials ready.
What are the Steps for DNS Settings?
Here are the steps that you need to follow for complete DNS setup
1. Access Your Domain Registrar
Go to your domain registrar’s website and log in with your credentials. Look for the DNS management section. Different registrars name this section differently, like DNS management, DNS settings, Name Server Management, Advanced DNS, etc.
The exact location varies by provider, but it is usually under domain settings or account management.
2. Configure Your MX Records
MX records stand for Mail Exchanger records. These records are special server settings that help control the way your Email is routed. It means MX records tells incoming mail which server can receive Email and then directs it to that server. Simply put, if your MX records are not set properly, you won’t be able to receive emails.
The structure of an MX record contains two values.
- Priority Number
- Domain Name
A priority number determines the order in which a server receives mail. It starts with the lowest available priority. If two servers have the same priority number, one will be chosen at random.
The second part is the domain name. It is the name of the specific mail server on which the mail is being sent. It generally looks like “ mail.DOMAIN.com .”

You need to replace mail.yourdomain.com with the mail server address provided to you.
Here are the steps that you need to follow to set MX records.
- Log in to your DNS hosting provider (GoDaddy, Cloudflare , Namecheap , etc.)
- Search the DNS settings for your domain.
- Add the new MX record.
- Verify the MX record as per the syntax image shown above.
For example,
Here are the steps that you need to follow to add an MX record if you’re using GoDaddy.
Add an MX record using GoDaddy.
- Sign in to your GoDaddy Domain Portfolio
- Choose an individual domain to access the Domain Settings page.
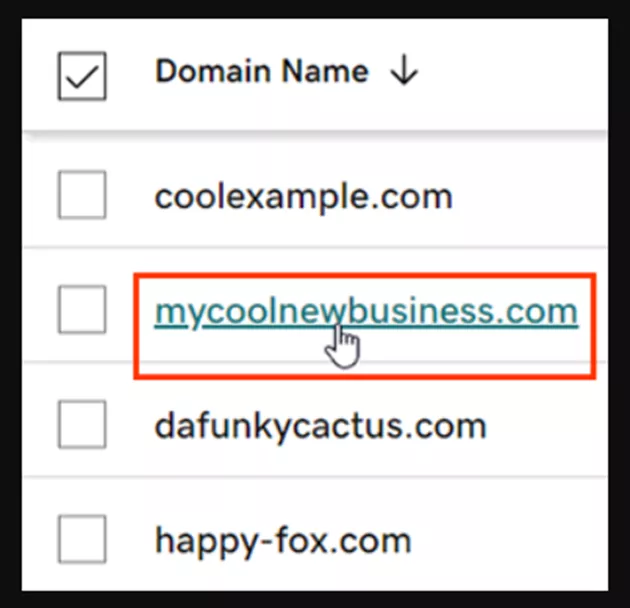
Image Source: Link
- Now, choose DNS to view your DNS records.
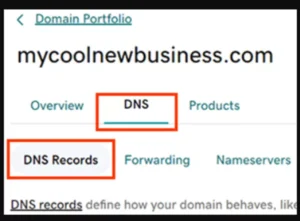
Image Source: Link
- Choose Add New Record -> MX
- Enter details about your new MX record. These details you will get from your email service provider, including: Name, Priority, Value, and TTL.
- If you want to add more records, choose ‘Add More Records’ and select ‘Save’ to add your new record.
- If you want to edit an existing MX record , follow the steps given in the link, to delete any specific MX record , here are the steps.
3. Add an SPF Record
A SPF record is a type of TXT record that lets you set up email sender policies and specify which servers can send emails on your behalf. It prevents spammers from faking emails from your domain.
An SPF record consists of the record type, host, and value fields.
Type – TXT
Host – @
Value – v=spf1 include:yourprovider.com ~all
For example,
To add an SPF record, you need to go to the DNS management page -> Add New Record. Then choose Type = TXT and in the value field, enter v=spf1 include:_spf.mailgun.com ~all. (You need to enter your provider name).
4. Set Up DKIM Records
DKIM stands for DomainKeys Identified Mail. It adds a digital signature to your email. It proves that the message really came from you and was not altered in transit. DKIM records are also TXT-type records but use a specific subdomain.
In DNS Manager, click ‘Add New Record’, then choose ‘TXT’.
In the host field, enter the subdomain, and in the value field, paste the DKIM keys.
Here is what DKIM records will look like.

Image Source: Link
DKIM keys are long, so make sure you copy the entire string.
5. Recommended DNS TTL Settings
TTL means Time to Live. It tells DNS servers how long to cache your records. Generally, the recommended TTL is 1 hour (3600 seconds). If you set it too high, then DNS changes take longer to update. Therefore, set the value between 300 and 3600 seconds so verification and updates happen faster.
Here are the DNS TTL settings.

6. Test and Verify DNS Records
Once you add all records, you need to verify they are working correctly. DNS changes do not happen instantly. It takes time to propagate across the Internet, depending on your provider. Therefore, wait for at least 15 to 30 minutes after saving your records.
You can use the following tools to test and verify your DNS records.
| Tools | Link |
| MX | https://mxtoolbox.com |
| SPF | https://dmarcian.com/spf-survey/ |
| DKIM | https://www.mail-tester.com |
| Where are your emails landing (Inbox, Spam, Promotions, etc) | https://www.gmass.co/inbox |
7. Follow Best Practices for Ongoing Deliverability
DNS setup is not a one-time task. You need to maintain it for optimal performance. Here are the best practices that you need to follow for ongoing deliverability.
- Keep your contact list clean.
- Update your DNS records when you change providers
- Keep your credentials secure
- Document your setup
- You must keep the SPF record under 10 DNS lookups
- Use consistent sender identity (From Name + Email)
- Never buy lists or send without opt-in
- Keep yourself updated about DNS standards
- Rotate DKIM keys every 6–12 month.
What are some Troubleshooting Quick Tips?
Here are some troubleshooting tips you should follow.
- If verification fails, double-check the host/name field and value field. If you have added one extra dot or missed an underscore, it matters.
- You need to ensure you’re editing the correct domain and the DNS provider has updated the records.
- If you have caching or propagation delays, wait a bit and retry verifying.
- If you accidentally add the wrong record type (e.g., TXT instead of CNAME), go back and delete it, then re-add it correctly.
If you have tried everything but are still facing issues, reach out to Textdrip support. They can look up your account and assist.
Wrapping Up
That’s it. Once the DNS setup is complete, your Textdrip account is ready to send high-quality emails with proper domain authentication. It makes your SMS campaigns run smoother with fewer hiccups.